I. Making New Folders
A. When in FINDER mode, from the File menu, select “New Folder” (shift, command N)
B. Into the new folder, drag any documents you may want to include in
the folder.
C. To change the name of the folder, click and hold on the folder
name for about 2 seconds
The folder name changes from being plain:,
to outlined in a box:
Click into the light blue box and type the name of your new folder:
D. You can even create folders within folders
by opening your first new folder (double click), and following steps
a - c from above.
E. There are several different views in which you can see how your
files are organized.
1. When you are in a folder window, one view may look like this:
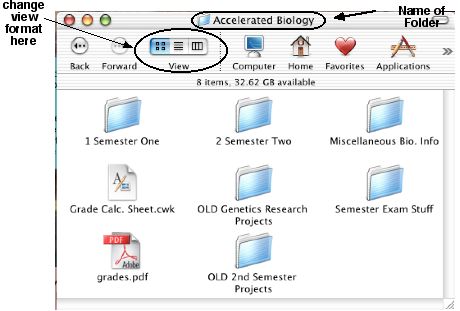
This is Picture view (command + 1). Clicking an icon displays a folder’s contents & opens a new window. Notice that the name of the folder is displayed at the top of the folder window!2. You can change the view format of a window from picture view to list view :
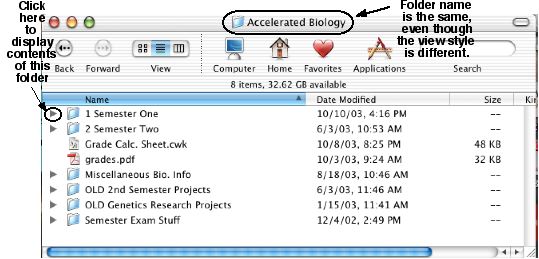
List view (command + 2) still has the folders as icons, but the icons are smaller. You can also view the contents of a folder by clicking on the triangle, without opening a new window.3. The third view style is column view :
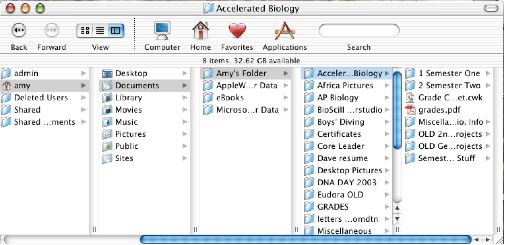
Notice how column view (command + 3) shows the “path” of how you found the folder and where exactly the folder is located within your documents folder (house). Column view is very helpful to use for those new to OSX so users can become familiar with the organization of their computer.
F. Organize folders by name, date modified, or ‘clean up’ the appearance of a window in any view mode by using the VIEW item from the FINDER menu:
You can change the view style of any window by clicking command and 1, 2, or 3 for picture view, list view and column view, respectively.
G. Column view is also the view style
used when saving files:
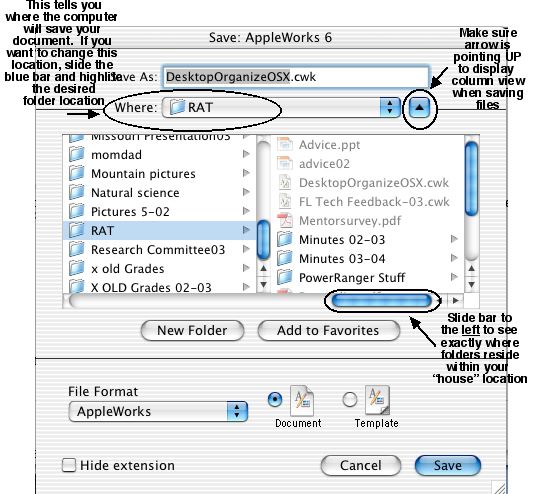
II. Adding Frequently Used Folders to your Dock
A. As you might have noticed from Part I,
accessing a particular folder may require several clicks! There is a
short cut to avoid multiple “click” sequences...
B. Select the folder using any view style explained previously.
C. Click and drag the folder icon to the dock:
*Make sure you drag the folder to the dock to the RIGHT(if dock is
on bottom of desktop) or BELOW (if dock is located on the left
or right side of desktop) the line which separates
applications from other items.
D. To remove the folder from the dock, click
and drag it off... it will vaporize “poof” from the
dock!
III. Personalizing your Desktop
A. Now you are ready to make your computer desktop unique. You
can customize the desktop to show pictures of your favorite vacation
spot, family, pets, or anything else.
B. You must have a digital version of the picture to display it onto
your desktop from a picture CD or a picture legally copied
from the internet.
C. Open the folder where the picture file is contained.
D. From the Blue Apple pull-down menu, select “System
Preferences”. Or you may access system preferences from your
dock, if it’s there.
E. Click on “desktop” from the Personal category:

F. The following window will appear:
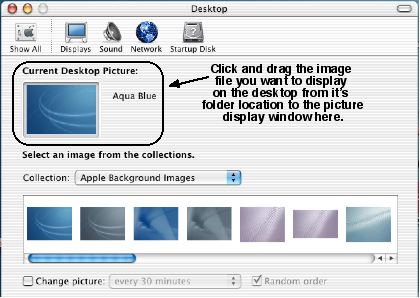
G. Arrange the windows so that both the Desktop window and the folder window with your picture in it are visible. Click on the image file from the folder window and drag it to the picture display window circled in the figure above.
H. The image in the box will change, and your
desktop immediately displays the new image!
I. Congratulations, you have just personalized your desktop!
J. You can be even more fancy by selecting an entire folder of images
to display on your desktop.
K. To have a folder of images, click on the “Collection”
pull down menu and select: “Choose folder...” You will have
to locate the folder where all of your images are stored on your
computer. First, organize the pictures you want to display , save
them into one folder, then open system preferences and the desktop
feature (as in steps d - f).
L. The following image displays the contents of a folder with several
different of images:
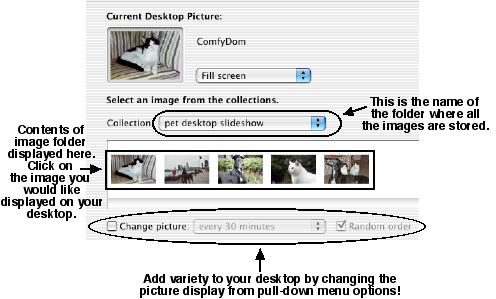
M. Click on an image from the collection
display window and that image will be displayed in the “Current
Desktop Picture” window, and your desktop image will change.
N. You can vary the images displayed on your desktop by checking the
box next to “Change Picture” and choosing from a variety of
options in the pull-down menu. Have fun, be creative, and have the
computer display your favorite images!
Organizing Your Digital Life
and Personalizing your OSX Desktop
Amy Inselberger, Science Teacher
Adlai E. Stevenson High School
Lincolnshire, IL