All about tabs...
Tab basics
In the days of the typewriter (before computer word processors), we used "fonts" that were
monospaced — each character and space took up the same amount of
space. (That's why we always were taught to space twice after a
period!) Now that we generate our typing with computers, most of the fonts that we
use are proportional spaced fonts; that is, each character takes only
the amount of space that it needs. (Single space after those periods
now!!)
Use tabs to align text perfectly!
With monospaced fonts we could use the space bar
to line up words evenly. (In the "olden days" we
counted characters in order to center text!) When we try that with
proportional spaced fonts, we often end up with undesired results
(even if it looks good on the screen!). If you wish to align text in
columns, always use the tab key! The space-bar should never be
used to align text -- it might look nice on the screen, but will
never print as you expect it to, plus, making changes later can be very
challenging.
|
Tabs come in five
flavors!
|
|
LEFT
|
|
The left tab is similar to the
typewriter tab of the "olden" days. Text will begin at the
tab position and continue to the right of the
tab.
|
|
RIGHT
|
With the right tab, text will end at
the tab and flow to the left.
|
|
CENTER
|
The center tab works similar to
centering a line of text but instead of centering between
margins, text is centered at the tab location.
|
|
DECIMAL
|
The decimal tab is used to line up
numbers and text with a period, or any character you
specify. Line up on the "=" for Geometry proofs!
|
BAR |
The bar tab places a "pipe" or vertical bar at the tab stop location. |
Setting
tabs:
If you do nothing, Microsoft Word has default settings -- "invisible"
tabs -- that exist on the ruler every .5". So, each time you press
or type the TAB key, your cursor moves about a
half inch to the right. You should learn to set custom tabs if you are pressing the tab key more than twice! You will have much greater control over the text, and changes to font styles and sizes, or moving documents to other systems that may not have the same fonts, will most likely preserve the layout and look of your document.
When you set a custom tab, it will apply
to all the text within a paragraph the cursor is "active in" — and will remain on the ruler as new
paragraphs are added, until the tab is removed. (A
paragraph is defined as something that ends by pressing the RETURN key. It could be a single line or multiple lines in a "traditional" paragraph.)
TO SET A
CUSTOM TAB:
1. Position the cursor in the paragraph where you want tab
settings OR highlight to select the paragraph(s) you want the tabs to be set
in.
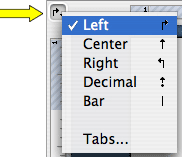 2. The Left tab
is the default choice and is ready for placement on the ruler. If you don't
want a Left tab, click the icon to the left of the ruler to select the
Center ,
Right , Decimal or Bar tabs.
3. Once your "tab flavor" is selected, simply
click on the ruler where you want the tab stop.
Tip!
If the tab didn't end up at exactly the right spot, click
and drag it to a new position on the ruler.
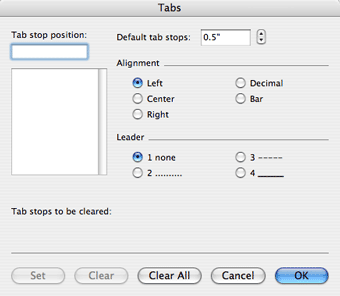
Tabs can also be set using a menu command (Format -> Tabs):
Enter the desired stop position, alignment choice and leader; then click the "Set" button for each tab.
TO REMOVE TAB SETTINGS:
1. Position cursor in the desired
paragraph, OR select the paragraph(s) you want the tabs
removed.
2. Drag the unwanted tab off the Ruler. Click
to release.
Or, return to the Format > Tabs menu, select the tab to delete and click the "Clear" button.
Leader Tabs
Leader tabs fill in characters (dots, dashes, underscores, etc.) from the
cursor to the tab stop location. They can be used to create a table of
contents, programs booklets or professional looking write-in forms. The Format >Tabs menu lets you set precise
measurements with dotted, dashed, or solid line "leaders" for tab
stops. (This is called a Leader Tab because the line leads the tab, in this case with a dotted line.) Once the tab stop is set, and you press the tab key, a dotted line will be drawn from the cursor position to the tab stop position.
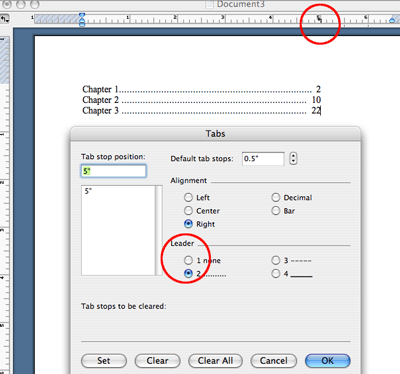
For example, the following settings produce a right aligned
tab with a dot leader for chapter page numbers:
Leader tabs
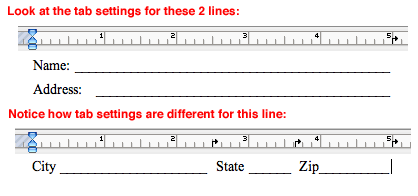
are great for Student Name and Date lines on the top of tests, or for
creating "write-in" forms:
All about
indents....
Indenting means to move text for an entire
paragraph away from the margins.
There are different types of indents.
|
First-line Indent
|

|
|
Left Indent
|

|
|
Hanging Indent
|

|
|
Double Indent
|

|
Using the Ruler
The Ruler gets is name because it looks
like a ruler at the top of the page. The Ruler shows page margins and
indents. By dragging with the mouse, you can change margins and
indents. The ends of the Ruler show the left and right
page margin boundaries. As the left and right margins are changed,
this will be reflected in the Ruler display. Although the Ruler is displayed by
default, you will need to turn it on if it is not showing. Select
View -> Ruler from the menu bar to
display the Ruler.
|

|
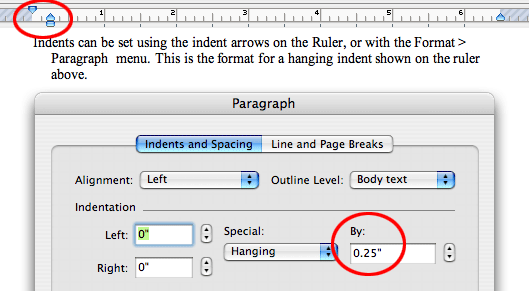
Indent markers (left, first-line, and
hanging) are on the left side of the ruler - they look like
an hourglass with a rectangle underneath. The two triangles
at the left side of the Ruler show the left indents for the
first line in each paragraph (top) and for all subsequent
lines (bottom).
To change a indent setting for the
selected text, simply drag the top or bottom triangle to the
desired location. Dragging the small rectangle beneath the
bottom triangle will move both triangles at the same
time.
|
|

|
On the far right of the ruler is the
right indent - it looks like a triangle, and can also be
changed by dragging.
|
- Select the paragraph(s) you want
indented.
- Left indent: Drag the rectangle
beneath the hourglass to the position you want the left
indent.
Right indent: Drag the triangle on the right of the ruler to
the position you want the right indent.
First-Line indent: Drag the top triangle on the hourglass to
the position you want the 1st line indent.
Hanging indent: Drag the bottom triangle on the hourglass from
the left end of the Ruler toward the right.
- Return the appropriate indent marker to the
left margin when you want indent to end.
How would you set the tabs and indents
below? Draw the correct tab and indents on the ruler!

Click here for the solution!
Setting TABS and INDENTS
Charlene Chausis, Technology
Trainer
Adlai E. Stevenson High
School
Lincolnshire, IL
Revised:
09/23/2006
Return to "Tutorials On
Line!" index
 2. The Left tab
is the default choice and is ready for placement on the ruler. If you don't
want a Left tab, click the icon to the left of the ruler to select the
Center ,
Right , Decimal or Bar tabs.


